
This is a very specific description of something I worked out how to do today. If you edit audio for things like podcasts you might find it useful. If you don’t then probably not so much…
The need
Just about every week these days I have an interview to edit for WB-40, and coming soon there will be a flood more as The Flexible Movement project takes shape.
For the most part the editing of these interviews is a bit rough and ready. It’s time consuming, and usually I’m looking to be able to cut 40 or so minutes down to 25. I’m not at the level of taking out every “err” and “um” – just finding blocks of less interesting conversation to cull, take out any gaps or mistakes, and have a reasonably well technically balanced bit of audio at the end of the process.
The opportunity
In the past few weeks my co-host Chris and I have been playing around with Otter.ai, a transcription tool that uses clever natural language processing to extract text from audio.
It’s by no means perfect, but it’s fairly accurate, and using it gives us the ability to make our show a little bit more accessible, and more importantly, searchable.
We’ve started putting the transcript into the bottom of the shows’ webpages – like here: https://wb40podcast.com/2018/11/19/episode-87-east-coast-empowerment/
Otter enables you to extract the text in a handful of formats, one of which is SRT – SubRip Text – a common format for subtitles.
Which got me thinking – was there any way in which I could take the text of an interview before I edited it, and bung it into the audio editor I use Audacity? TL/DR – the answer is “Yes!”
The net result of this is that I can see the transcript of the text as labels in Audacity as I am editing. This has the opportunity to make my life a whole lot easier, and my editing a whole lot better.
What you will need…
- An audio recording of some people talking to each other. MP3 format is fine.
- The Audacity open source text editor
- An account on Otter.ai
- The
Audacity Labels (TXT) Subtitles (SRT, SBV) Convertor.xls spreadsheet. This sheet contains macros, and although I have used it and have seen nothing bad happening, I can’t guarantee it’s not now sending all of my personal details to the Russians. Use at your own risk.
(It might be worth pointing out that my mum used to work for Blue Peter and was responsible for all of the cookery slots in the Mark Curry era. That might be starting to show…)
Method…
First off, you need your transcript. Upload your audio into Otter, and it will begin to transcribe your spoken word.
If you’ve got more than one person speaking, it’s worth identifying a couple of times when each speaks and then choosing the Rematch Speaker option from the ellipsis menu, which will take about 10 minutes to reasonably accurately identify who said what.

When you’ve done that, select the Export Text function, and then choose the SRT format option.
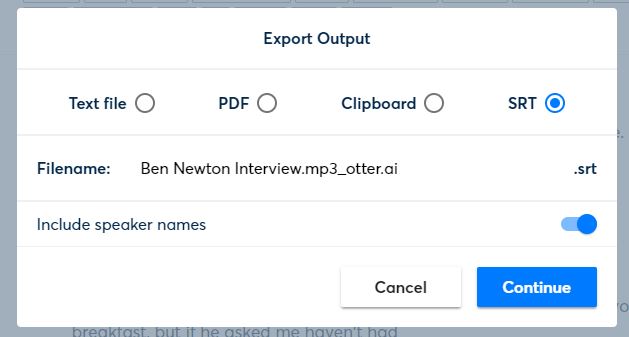
This will create a text file with the SRT extension, which will download to your computer (I’m assuming you’re doing this on a PC or Mac). Open this file in a text editor (you might need to change the file extension to txt to allow that to happen – alternatively right-click on it and choose Open With-> Notepad (on a PC)).
Select all the text, and then copy it with CTRL-C (Apple-C on a Mac).
Next, fire up the Converter spreadsheet, enable macros, and then paste the contents of the SRT file into cell A4 on the first worksheet.
Click on the TXT to button, and the Audacity text file format will appear on the right hand side of the screen. Select the contents of columns G & H, copy them, and then paste the data into a new Notepad/text editor document. Save it with a TXT extension – this is your Audacity text labels file.
Finally, open up Audacity, and open up your original audio file. Then from the file menu choose Import->Labels

And then, as my mum used to say… Here’s one I made earlier:


One thought on “Apply transcripts to audio in Audacity”